
Getting Started
Sign Up
1. Once at www.hivemanager.app select the “Signup” tab at the top.
2. You are required to agree to the terms and conditions and either:
-
Fill out the name, email and password OR
-
Select a service provider (Google, Facebook or Microsoft)
3. Once completed Select “Sign up”

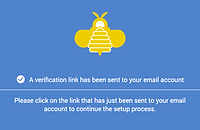
4. You should see this screen next which will verify that you have been sent a verification email
5. Go to the email entered and find the "Verify email". It should look like the following.

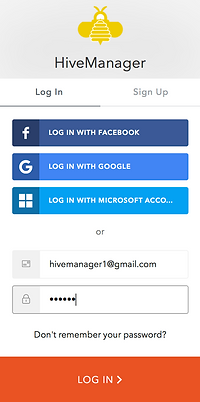
6. Select the “Confirm my account” link on the email
7. This will take you back to the login screen where you can login using the same credentials as previously used to sign up.
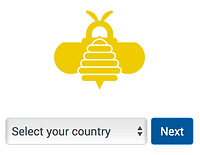
8. Once you select SIGN IN, it will bring you to a screen to select your country. This will only happen on the first sign in.
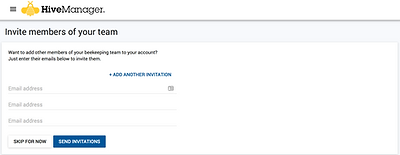
9. Once you select a country and the "Next"" button, you will be asked if you would like to invite other members of your team
-
You can "SKIP FOR NOW" and invite users later from the User menu in the app
-
Or, you an add the emails of members you would like to invite to share your account. Make sure to use the email that you want them to use to login with. They will not be able to use a different email.
10. If you invited other members of the team, you will see the following page. You can select "GO TO DASHBOARD". If you did not invite any members of your team, you will go there automatically

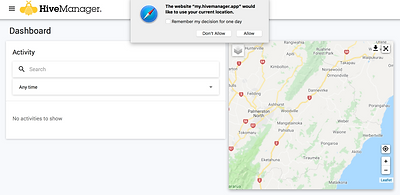
11. Depending on the device you are using (width of screen) you will see one of the following two screens. Select the "Allow" button so that the app can locate your current position on the map.

12. From here you are ready to start adding Properties and then Apiaries
Adding Properties
-
Navigate to the properties screen using the Menu icon on the top left corner
-
Select the "+" button to add a property Name or identifier
-
Once entered select "SAVE" from the top right
-
The property you added will now appear on the properties screen.
Adding Apiaries
-
To add apiaries either:
-
Select the property from the properties screen, then select the "+" button to add an apiary OR
-
Navigate to the apiary page from the menu and select the "+" button
-
-
You will then be required to enter the property and the apiary name. In addition you can also select the map icon to enter it’s location. (optional)
-
If you choose to enter the location, move the map around until the "+" in the centre of the screen is in the correct position, then select “SELECT” and then “DONE” to confirm.
-
Once the apiary details are completed select “SAVE”
-
Apiaries added will now appear on the apiary list
Viewing Comments in Dashboard
-
Any comments added to an apiary are automatically displayed on the dashboard in the order they were made.
-
Searching comments and #TAGS
-
You can search for specific comments or #TAGS within a specific time period
-
Simply enter what you want to search for in the search bar and use the date filter below to search for either a predefined time period or custom time period.
-
Once the search is defined then the map tab can be selected to view all corresponding apiaries (indicated by blue apiary icon)
-
NOTE: On devices with a wide enough screen, the map will be displayed to the right of the activity search
